|
|
|
Understanding the OnePad Interface
The OnePad interface is divided into five key areas. The default layout is shown below. Which buttons and tabs you can see will depend on your configuration and the assessment type you select. See Using Dynamic Display for more on the changes
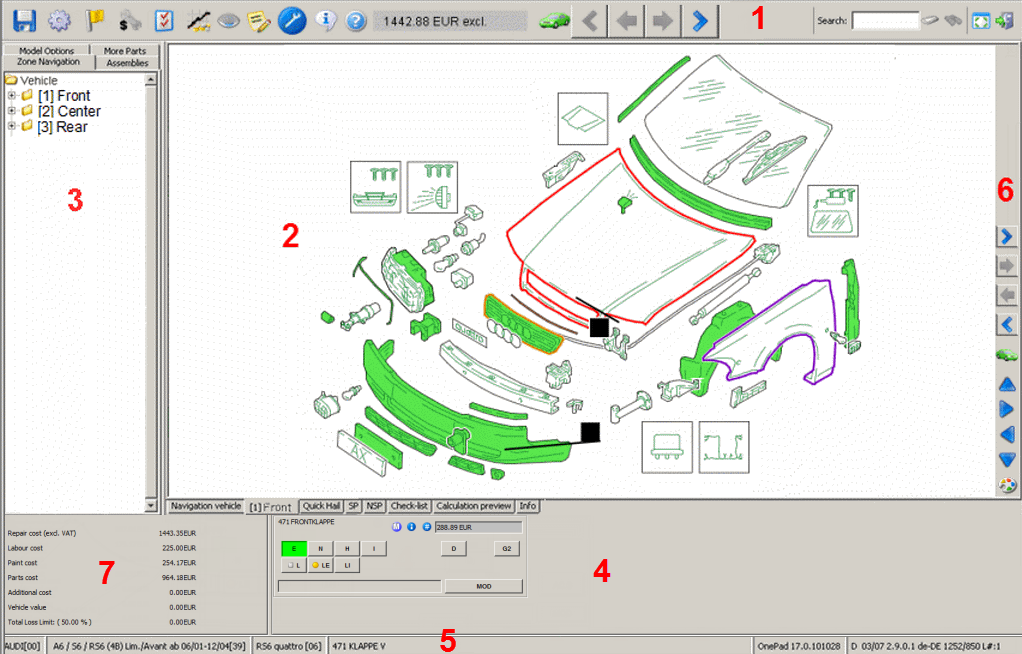
Toolbar (1)
The Toolbar includes buttons for selecting model options and ID Block Codes, configuring features such as cost optimisation and also buttons for searching for parts and navigating through vehicle zones.
Vehicle Drawings Panel (2)
OnePad loads drawings of the selected vehicle model into the Vehicle Drawings Panel. Using these drawings, you can select parts and then select a repair method from the Repair Panel. Refer to Capturing Damage Using Part Drawings for more information. In this panel, you can also view standard and non-standard positions, a checklist of the captured parts and a calculation preview.
Zones Panel (3)
The Zones Panel includes configurable tabs that you can use to:
- Locate vehicle parts by zone. Refer to Selecting Parts Using the Zone Navigation Tab.
- View and select variant parts by zone. Refer to Selecting Variant Parts Using the Variants Tab.
- View and select vehicle assemblies and assembly parts. Refer to Selecting Assemblies and Assembly Parts.
- For Dynamic Display models, view and select model options. Refer to Selecting Model Options Using the Model Options Tab.
- For Dynamic Display models, view and select individual implausible parts. Refer to Selecting Additional Parts Using the More Parts Tab.
- View any uploaded images of vehicle damage. Refer to Viewing Images.
Hiding
When you are viewing vehicle parts, you can hide this panel by double-clicking inside the Vehicle Drawings Panel. This is particularly useful if you are working with a pen computer. Double-clicking once again inside the panel restores it.
Resizing
If you do not wish to hide the panel completely you can resize it. Simply position the mouse between the Zones Panel and Vehicle Drawings Panel. The mouse cursor changes to ![]() . Now, click and hold the left-mouse button and drag mouse to the left to decrease the width or to the right to increase the width.
. Now, click and hold the left-mouse button and drag mouse to the left to decrease the width or to the right to increase the width.
Moving
You can move the Zones Panel from the default position on the left of the browser window to the right by selecting the Left-hand support tickbox in the User Settings tab. See Configuring User Settings.
Repair Panel (4)
In this panel, you select repair and paint methods for damaged parts. Clicking MOD in the Repair Panel displays the Modification Panel, which you can use to override system values. Refer to Overriding System Values for more information.
If configured, you can move the Repair Panel to a new position by selecting the tickbox in the User Settings tab. See Dragging and Docking the Repair Panel.
Status Bar (5)
The left-hand section of the status bar displays the vehicle manufacturer, model and sub-model. When you hover the mouse over a part, the system displays the part number and part description in the middle section of the status bar. In the right-hand section of the status bar, the system displays the version of OnePad and the data files. You may be asked to provide this version information to resolve a technical issue.
Navigation Toolbar (6)
If configured, buttons for navigating around a vehicle are also displayed in the Navigation Toolbar. See Navigating Around a Vehicle
Total Loss Panel (7)
If configured and if Total Loss has been enabled, the current repair costs and breakdown will be shown in the Total Loss Panel. See Configuring and Using Total Loss.
Notes:
- Clicking the manufacturer/model/sub-model part of the status bar opens the About OnePad dialog box. Refer to Viewing, Exporting and Sending System Information for more information.
- The status bar may not be configured to display for your organisation. If it has been configured not to display, you can find vehicle information at the top of the browser window.